Creating a work order
You create a work orderWork OrderA planned production run: pick materials, build the items, do QC, and complete — all tracked together. Use work orders when you're building stock ahead of demand or running a multi-day project. Read more → from the Work Orders list page in the assemble bench. There are four paths in, depending on what you already know about the job, and three save modes that decide what state the work order lands in.
On this page
Section titled “On this page”- The four creation paths
- The three save modes
- Duplicating an existing work order
- Filtering and sorting the list
- Deleting a work order (hard vs soft)
The four creation paths
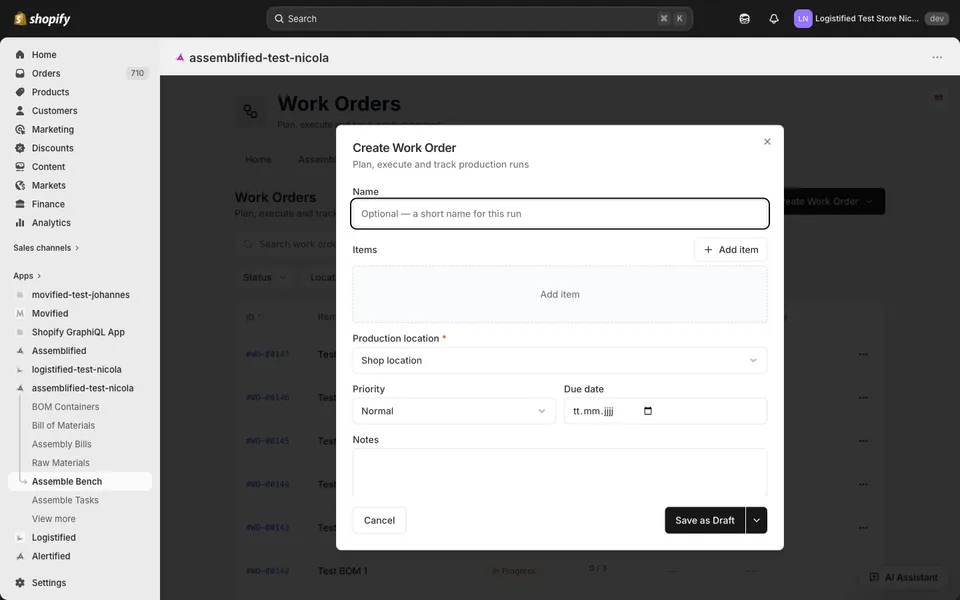
Section titled “The four creation paths”Click Create on the list page to open the menu.
Pick Empty when you know the job exists but you’ll add items to it later. Set a name, a production location, and submit — the work order lands in draft with no items. You add items on the canvas afterwards.
Use this when you want a placeholder you can build out over time, or when none of the other three paths fit.
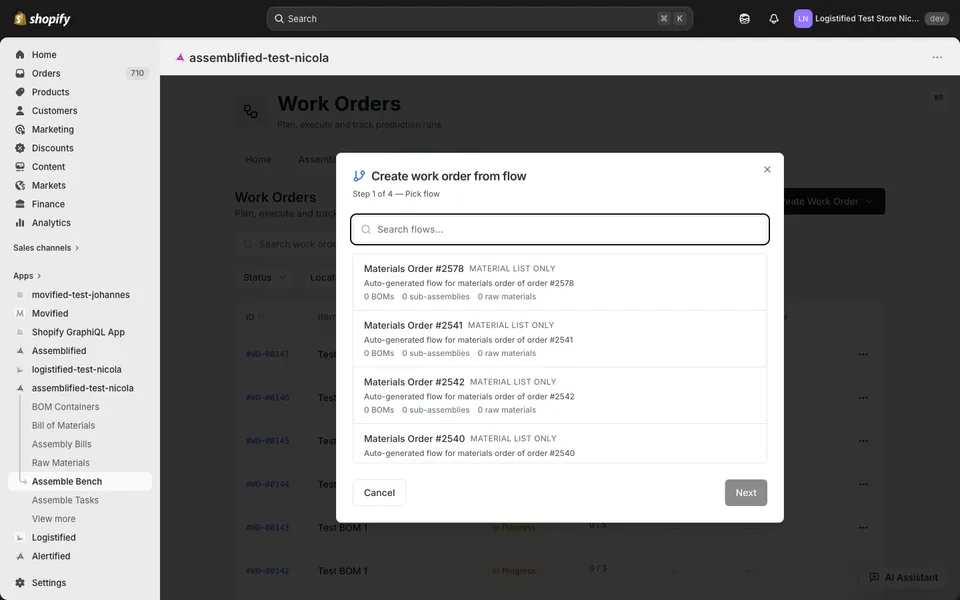
From a flow
Section titled “From a flow”Pick From a flow when an Assembly Flow already describes the recipe. The dialog asks for a flow, lets you adjust per-item quantities, and then previews the spread of materials and the planned cost before you submit. The new work order is linked back to the flow as its source.
This is the closest equivalent to the order-driven BOM path, but persisted as a planning artifact.
From a BOM (or sub-assembly)
Section titled “From a BOM (or sub-assembly)”Pick Empty and use the item picker — there is no separate “From BOM” dialog. Add a BOMBill of MaterialsA bill of materials tells Assemblified how to build one unit of a finished good. When a customer orders the finished-good variant, Assemblified deducts the right component quantities from inventory automatically. Read more → or sub-assemblySub-AssemblyA reusable assembly block that composes into bigger BOMs. Define it once, include it in any BOM. At execution time, Assemblified expands the sub-assembly into its own components recursively. Read more → as an item with the quantity you need, and Assemblified spreadsSpreadThe step that walks each item's BOM (and any sub-assemblies inside it) and turns the result into the flat list of materials the work order needs. Runs automatically when you add an item — unless you choose "skip for now" and plan the materials yourself. Read more → the materials automatically.
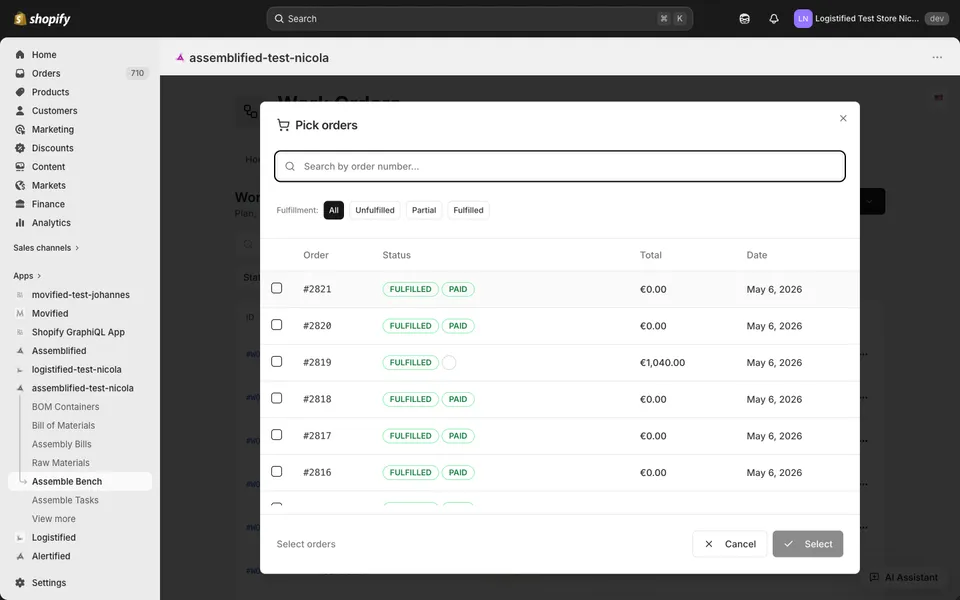
From Shopify orders
Section titled “From Shopify orders”Pick From orders when you’re building stock to fulfil one or more existing Shopify orders. The dialog accepts a comma-separated list of order GIDs (or links from the order picker). Assemblified reads each order’s line items, matches them against your BOMs, and seeds the work order with the items it found. The order GIDs are saved on the work order so completion-time integrations (tag orders, the order metafield overlay) know which orders this job satisfies.
The three save modes
Section titled “The three save modes”Every create dialog offers three submit buttons:
- Save as draft — lands in
draft. Plan is fully editable; nothing is locked. - Save & mark ready — runs the same checks as the Mark ready transition, then lands in
ready. The plan is still editable but the work order is signalling that the next step is to start building. - Save & start — equivalent to Save & mark ready followed by Start. Lands directly in
in_progress. Build runs can begin immediately.
Both Save & mark ready and Save & start require the work order to pass the readiness check: at least one item, a production location, and no zero-quantity active materials.
Duplicating
Section titled “Duplicating”Open the row menu on the list and choose Duplicate. You can pass a name, or let Assemblified default to <original> (Copy), then (Copy 2), (Copy 3), … until it finds a free slot.
What gets copied: the work-order row itself (forced to draft), all items, all materials, all contributions. What does not get copied: lifecycle events, build runs, QC reviews, rework items, notes, documents, the assignee, the due date, and any consumed-quantity progress. The duplicate is a fresh draft, not a snapshot of execution state.
Filtering and sorting the list
Section titled “Filtering and sorting the list”The list page supports:
- Free-text search across the work-order short ID (
#WO-NNNNN), name, and assignee. - Status filter — multi-select across the eight statuses.
- Location filter — by production location.
- Assignee filter — by user.
- Source filter —
flow,bom,sub-assembly,orders, orempty. - Sort — by short ID, progress, due date, created at, or updated at. Progress is the SUM of completed quantities divided by SUM of planned quantities across the work order’s items.
Each filter dropdown shows a count next to each option, computed across the unfiltered set so you can see how many work orders any given filter would match.
Deleting
Section titled “Deleting”Open the row menu and choose Delete. The behaviour depends on status:
| Status | What happens | Recovery |
|---|---|---|
draft | Hard delete — the work order and all its items, materials, contributions, lifecycle events, and notes are removed for good. | None. |
cancelled | Soft delete — deletedAt is stamped, the row stays for audit but disappears from every list. | None from the UI. |
| Anything else | Blocked. The error tells you to cancel first, then delete. | Cancel the work order, then delete it. |
Soft-deleted work orders cannot be revived from the UI — the affordance doesn’t exist. Hard-delete from draft is the only path that frees up the original short ID and name.
Related
Section titled “Related”- Lifecycle — what each status means and when each transition is allowed.
- Canvas Editor — edit items and materials after creation.
- Glossary — every work-order term in one place.