Canvas Editor
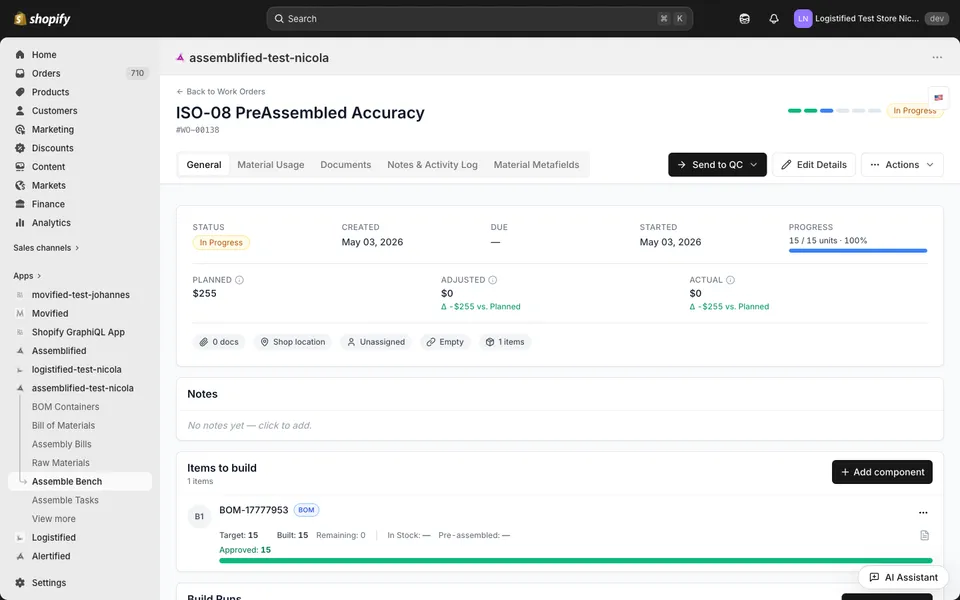
The canvas is the work order detail page — where you assemble the actual contents of the job. Items live on one tab, materials on another, with a few more tabs around them for files and history. Most edits are allowed in every status except completed and cancelled, which freeze the plan.
On this page
Section titled “On this page”- The five tabs
- Adding an item (with auto-spread vs. skip-spread)
- Editing a planned quantity (re-spread vs. decouple)
- Adding, replacing, and removing materials
- Refreshing from the source BOM
- Per-contribution edits
- Custom metafields per material
The five tabs
Section titled “The five tabs”| Tab | What’s there |
|---|---|
| General | Items to build, build runs card, planned/baseline/actual cost summary, action buttons. |
| Materials | Material list with bulk-edit, refresh-from-BOM, shortage warnings, location overrides. |
| Documents | Uploaded files (drawings, specs, photos). Stored securely; one-click download. |
| Activity | A unified timeline of lifecycle events (start, pause, …) and build-run events (pick, complete, reverse). |
| Metafields | Per-material custom fields, in two tiers — material-level (one value across all units) or unit-level (one value per produced unit). |
Adding an item
Section titled “Adding an item”On the General tab, click Add component. The picker lets you select a BOMBill of MaterialsA bill of materials tells Assemblified how to build one unit of a finished good. When a customer orders the finished-good variant, Assemblified deducts the right component quantities from inventory automatically. Read more → or sub-assemblySub-AssemblyA reusable assembly block that composes into bigger BOMs. Define it once, include it in any BOM. At execution time, Assemblified expands the sub-assembly into its own components recursively. Read more → and a planned quantity. Raw materials and bare Shopify variants are not addable as items — items are always things you’re building, not consuming.
When you submit, Assemblified runs the spreadSpreadThe step that walks each item's BOM (and any sub-assemblies inside it) and turns the result into the flat list of materials the work order needs. Runs automatically when you add an item — unless you choose "skip for now" and plan the materials yourself. Read more → algorithm: it walks the item’s BOM (and any nested sub-assemblies) and adds every required material to the materials tab. For sub-assembly materials it also computes an initial split between pre-assembled inventoryPre-Assembled InventoryStock of finished sub-assemblies and BOM items that have already been built and are sitting on the shelf. When a work order needs a sub-assembly, it draws from pre-assembled inventory first and only builds fresh ones if the shelf comes up short. Read more → on the shelf and quantity-to-build from raw materials.
Skip the spread
Section titled “Skip the spread”The item dialog also offers Skip materials for now. With this on, the item is added with plannedQuantity but no materials are spread. Use it when:
- You want to plan the materials by hand instead of from the BOM.
- The BOM has changed since you last used it and you want to start from scratch.
- You’re building a one-off variant that diverges from the recipe.
You can plan the materials manually afterwards from the Materials tab.
Editing a planned quantity
Section titled “Editing a planned quantity”Open the item row and edit plannedQuantity. What happens next depends on whether any build runs have already happened against that item.
- No build runs yet — Assemblified clears the item’s existing material contributions and re-runs the spread at the new quantity. This is the clean re-spread path.
- At least one
builtrun exists — Assemblified does not re-spread automatically (a re-spread would invalidate the consumed-vs-planned math on the existing build). Instead it decouplesDecoupleDetaching one work-order item from the live BOM so its material list stops following BOM updates. After you decouple, edits to the BOM no longer flow into this work order — useful when you've already started a build and need a frozen recipe. Read more → the item: the newplannedQuantityis saved, the materials are left untouched, and the item is flagged as having manual overrides.
Once decoupled, future quantity edits keep decoupling rather than re-spreading. To get back to BOM-ratio basis, use Reset to BOM on the item — see material planning → reset paths.
Adding, replacing, and removing materials
Section titled “Adding, replacing, and removing materials”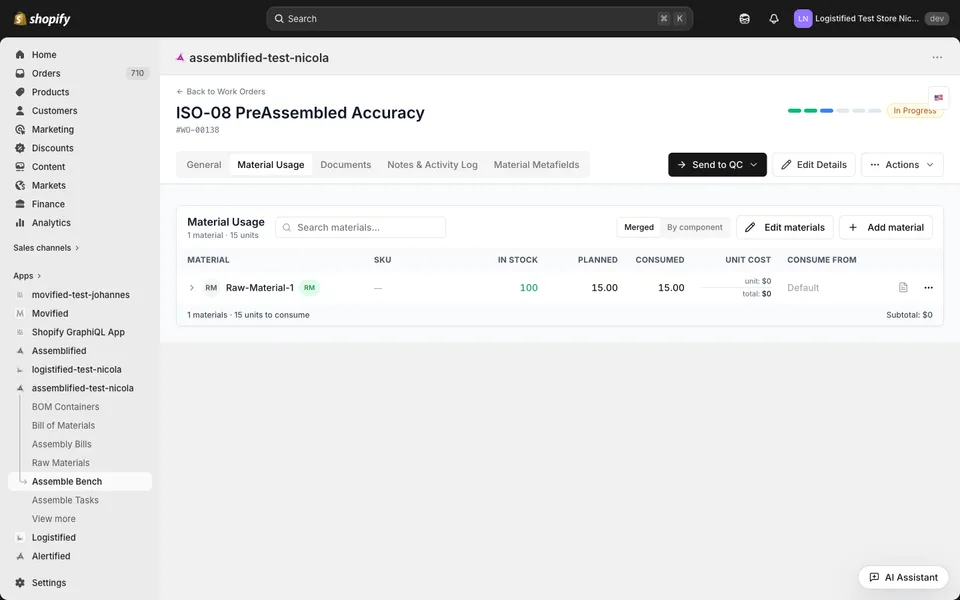
On the Materials tab:
- Add a material — the Add material button opens a dropdown with two paths:
- Raw Material & Assemblies — pick from raw materials and sub-assemblies that already exist in Assemblified.
- New Materials — pick directly from your Shopify product catalog. Each picked variant is created as a raw material (with inventory levels synced from Shopify) on the fly, then attached to the work order. After picking, choose an item to attach the material to (every material must trace back to at least one item) and the quantity. The added material is flagged as a manual override.
- Bulk edit quantities — select rows, edit the effective quantitiesEffective QuantityThe quantity actually consumed by the work order, after operator overrides. Starts equal to the original BOM quantity, but can be adjusted up or down per material as plans change. The effective quantity is what the pick list and cost calculations use. Read more → together, save in one round-trip. This also bulk-edits the consume-from location and the round-up flag.
- Replace a material — open the material’s row menu and pick Replace material. You can replace with an existing material (raw or sub-assembly) or with a new Shopify material picked straight from your catalog. The original material’s status flips to
replaced(kept for audit) and the replacement takes over its quantities and contributions. - Remove a material — soft-removes the row. It stays in the database flagged
removed, but build runs ignore it. Permanent removal happens only when the parent item is deleted.
Refresh from BOM
Section titled “Refresh from BOM”The Materials tab has a Refresh from BOM button. It walks every item, re-spreads them, and reconciles against the current materials list:
- New BOM lines that aren’t on the work order yet → added.
- Old BOM lines that the work order still has but the BOM no longer needs → removed.
- Existing BOM lines whose quantities changed → quantity updated unless the row was manually overridden.
Manual overrides are sticky. Once you’ve edited a row’s effective quantity, refresh-from-BOM leaves it alone on quantity changes. New BOM lines are still added, even if other rows are overridden — refresh treats additions independently from quantity diffs.
If you want a clean slate (wipe every override, re-spread everything), use Reset material quantities on the action menu — see material planning → reset paths.
Per-contribution edits
Section titled “Per-contribution edits”A single material on a work order can be needed by more than one item. The link between a material and the items that need it is called a contribution. The Materials tab can expand each material to show its contributions, and you can:
- Delete a single contribution — remove the link from one item only. The material’s quantity drops by that contribution’s amount. The material itself stays if other contributions remain.
- Replace a single contribution — swap the material under one item’s contribution without touching the other items’ contributions to that same material. The replacement can be an existing raw material / sub-assembly or a fresh pick from your Shopify catalog (same fork as the row-level replace).
This is rarely needed for simple BOMs but matters when one raw material is shared across several items in the same work order.
Material metafields
Section titled “Material metafields”Every material can carry custom metafields beyond quantity and location — examples are lot numbers, supplier batch IDs, calibration notes, finish specs.
Two tiers:
- Material-level — one value per material per definition, shared across all produced units.
- Unit-level — one value per produced unit (e.g. a serial number per unit built).
Use the row menu’s Switch tier to flip between the two. Existing values migrate where possible. The Prefill action copies values from another material’s metafields, useful when the same SKU appears under two BOM lines.
Related
Section titled “Related”- Material planning & costs — the reset paths and how quantity overrides flow into cost views.
- Build Runs — how the canvas plan turns into a pick.
- Lifecycle — the statuses that freeze the canvas.
- Glossary.